Do you use an adblocker? If you do, you’re likely using one through a browser extension such as ublock origin. Adblockers are a great thing; they make browsing the internet much more tolerable. What if there was a way to block ads for everything on your network, including those annoying little ads on apps for your phone?
Enter Pihole, a network wide ad blocker. Pihole acts as a DNS sinkhole where DNS queries from blacklisted domain are sent to your pihole server instead of your device. But, what does that exactly mean? First, a quick overview of DNS.
DNS Overview
DNS stands for Domain Name System. The purpose of DNS is to resolve domain names to their IP addresses. A domain name is what we’re all familiar with when visiting websites. Examples would be https://www.twitter.com or https://www.youtube.com.
However, data is routed through networks using IP addresses, not domain names. So, when you type in a website into your browser, it needs to make a request to a DNS server to see if it has the IP address for a given domain. Once the DNS replies with the IP address, your device is able to reach the website.
DNS is convenient for us humans because it allows us to not have to remember the IP address of every website we visit. Instead of having to type 142.251.33.110, you can just type in google.com. Imagine having to remember some string of numbers for every website you have to visit. You can think of DNS acting similar to your contact list in your phone. You map peoples’ phone number to their name so you don’t have to remember the phone number of every single person you know.
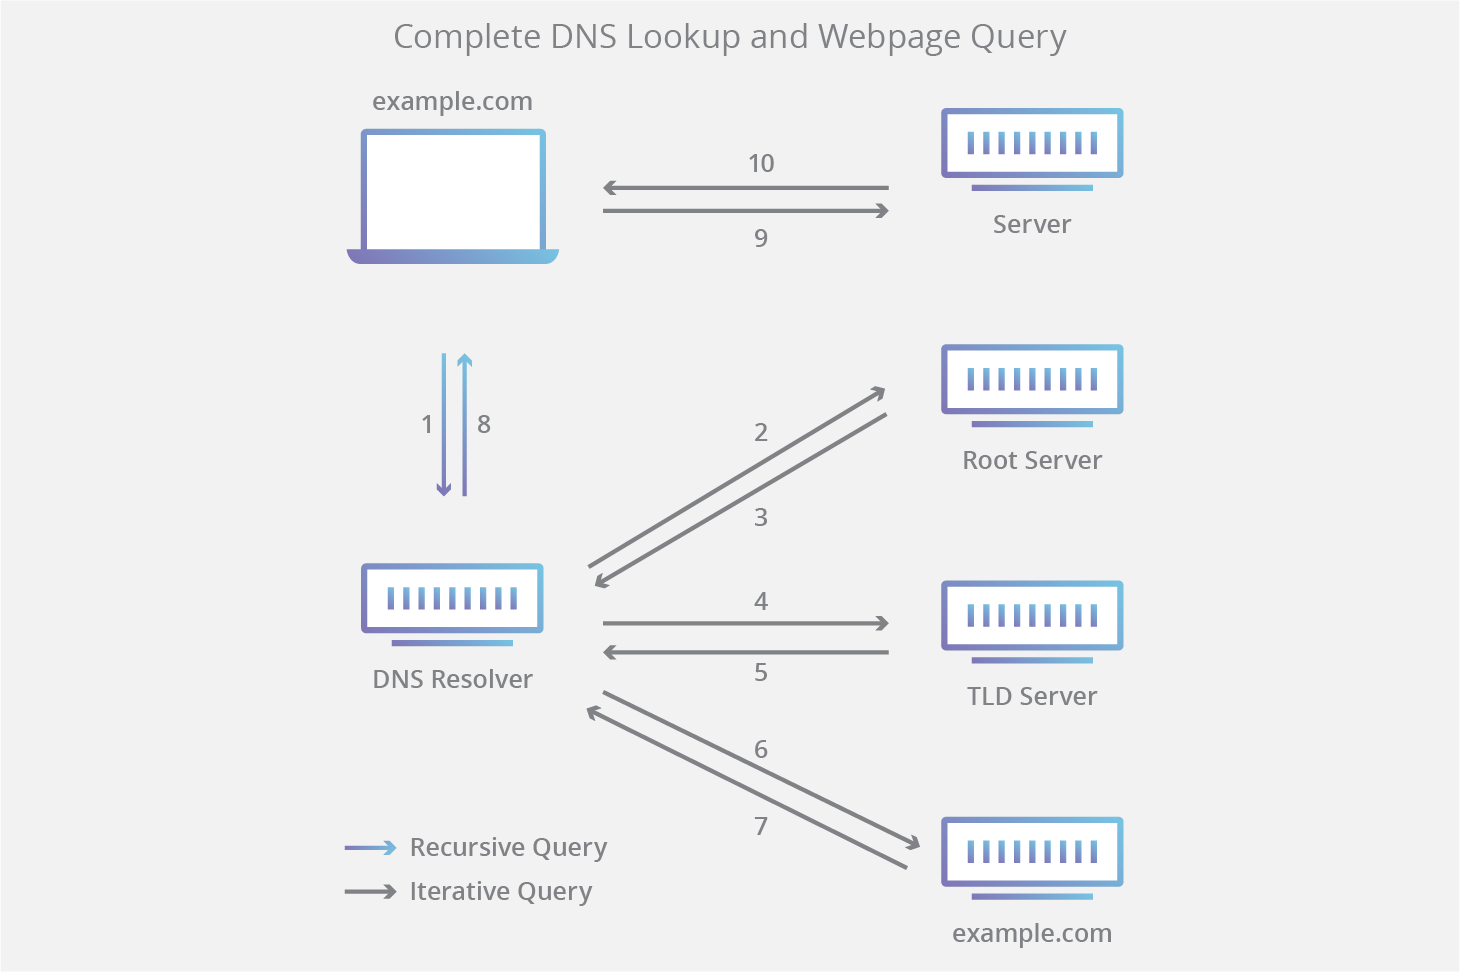
The below diagram shows a more detailed look at how DNS works. There are actually several DNS servers involved when resolving a domain name. Here’s the basic outline of the process:

- You type a website name and a request is sent to your local DNS server. On your home network, this is usually your router.
- Your local DNS server makes a request to it’s configured root server.
- The root server replies with the address of a Top Level Domain (TLD) server. A top level domain is what is placed at the end or web addresses such as .com, .org, or .net. For example, a request to twitter.com would get end up getting forwarded to the .com TLD server.
- A request is made to the TLD server.
- The TLD server sends the address of the website’s authoritative name server where its DNS records are stored.
- A request is made to the name server of the requested site.
- The name server replies with the IP address of the requested site to the local DNS server.
- The local DNS server provides the result to the local machine and the answer is cached.
How Pihole Works
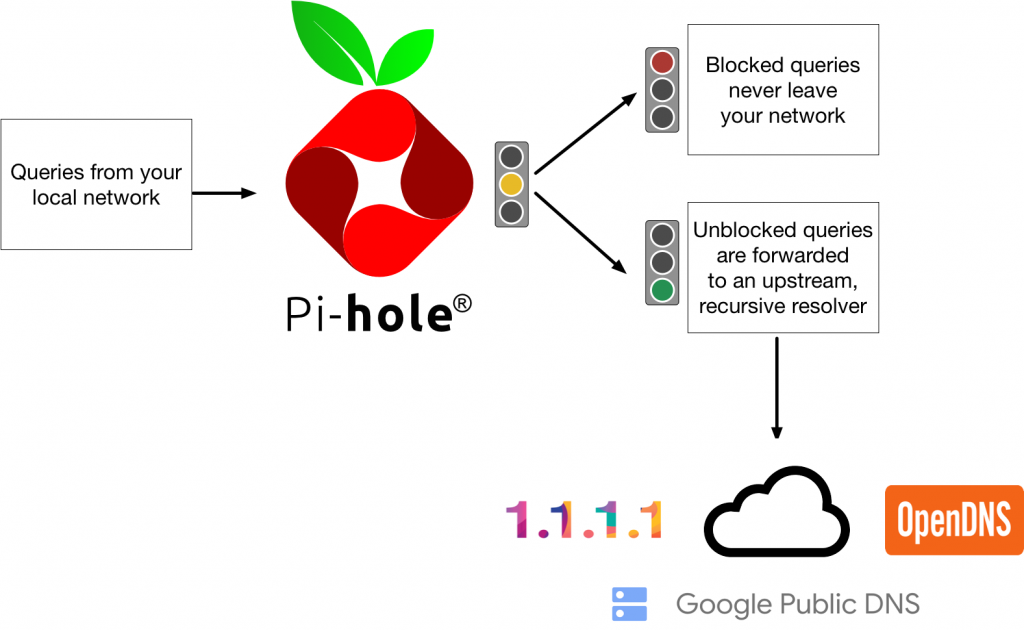
Pihole acts as the DNS server for your local network. Instead of only resolving DNS queries like your router would, pihole uses blocklists to determine if a request gets sent out of the network to be resolved. If a DNS query from a machine matches a domain on the blocklist, the domain is pointed to the pihole’s IP address instead of it’s actual IP address, resulting in it being “blocked” or not showing up on the client device. Whitelisted domains get forwarded to an upstream DNS server to continue the domain resolution process as normal.

Of course, you’re not typing in the domains of advertisers into your web browser. What happens is during the DNS resolution process, other servers not related to the DNS resolution process get involved and their data gets attached in the exchange. Some of this data is for advertisers and other content providers. This data contains domains that under normal circumstances get resolved to their associated IP address and show up as ads on your device. However, if any of these domains are on the pihole’s blocklist, their IP address is resolved beforehand to the pihole server’s IP address before the DNS query leaves your network. It effectively ignores these domains’ IP resolution, leaving only the initial DNS query’s being shown on the requested machine.
Pihole Installation
This will be an installation on a Windows system. For this installation, you will need:
- Raspberry Pi (Any model will work, I am installing this on a Raspberry Pi Zero)
- USB to Ethernet Adapter (If using a Raspberry Pi Zero and want a wired connection)
- SD Card
- USB SD Card adapter
Since I’m going to install this on a Raspberry Pi, I’m going to use the Raspberry Pi Imager. The Raspbery Pi Imager allows you to configure the initial pihole settings before flashing the SD card, making setting up the server much simpler.
First download the software at https://www.raspberrypi.com/software

After downloading, run the executable


Next, click choose OS, then select Raspberry Pi OS (other), I chose raspberry pi lite since this will installed on a pi zero.


Make sure your SD card is inserted and choose storage of media you want to install. This machine is going to be configured without a monitor so next we need to make sure we have the ability to do that. Click the gear icon in the bottom right corner

Set a name for the machine and click to enable ssh. Scroll down and set a username and password. Remember these credentials. Configure WLAN if you plan to use wireless for your setup. When done, hit save.


Save settings and then hit write.

Plug in the pi. This will be a headless installation so we’re going to need the IP address of the machine so we can ssh into it. To get the IP, I’m going to log into my router and check the attached devices. How to do this varies by router but in general, there should be a tab in the menu bar for attached devices. In the table, I can see the pi’s IP is 10.0.0.6.

For pihole to work correctly, it needs a static IP. To ensure its IP doesn’t change, I’m going to reserve it. For my router, I went to “Lan Setup”, then hit “add” under Address Reservation.

Then, I selected the button for the PIHOLE then clicked add. The device name seen is different because this screen is using the hostname instead.
Now, I’ll ssh into the machine using the username created earlier.

Update the system with the following command:
sudo apt update && sudo apt upgrade -y.
Install pihole with:
curl -sSL https://install.pi-hole.net | bash.
Run the script and wait for the pihole installer to start. It may take a few minutes.
Click OK.

This is why we set a static IP earlier. Click continue.

This is a wired connection so I’ll choose eth0.

The IP address, netmask, and gateway are all correct so I’ll hit continue.

Choose an upstream DNS provider. This is what will resolve domain names for the internet.

Pihole needs lists to function. Choose yes. More lists can be added later.

Click yes to install the web interface.

Install the modules for the web interface

Enable logging.

Choose the level of detail wanted for logs.

The installation is done. Make note of the password so you can access the web interface.

Open a web browser to log in to the interface. You can use either the IP address of the server or the hostname assigned to the device when writing the Iso to the SD card. In my case, the address will be http://pihole.local/admin, where pihole.local is the assigned hostname of my device.

This is the dashboard. Take a look around. You can see under “Domains on Adlists” already has 151,072 domains. These are the number of domains on the blocklist from the initial installation.

Before continuing, let’s change the password of the web interface. Back in the shell, type in pihole -a –p. Then type in your new password.


Now that pihole is installed and the web interface is enabled, the final step is to have other devices on the network use pihole as their DNS server. Most likely, the devices on your network are using your router as their DNS server. Instead of changing each device to point their DNS queries to the pihole server, we’re going to have our router use the pihole server as its DNS server.
Back in my router, I changed the settings to only Pihole as the DNS server. Now, all DNS requests from devices on the network will go to the router which will then get forwarded to the pihole server.

And now, our new network-wide ad blocking server is ready.
In a future post, we’ll use the local DNS feature of pihole so the other services on the network can reached with easy to remember names instead of IP addresses. We’ll also set up pihole as a recursive DNS server so our pihole server will handle upstream DNS requests as well.


